Sunday, January 30, 2011

Risotto Cakes


Whatever you're doing, stop. Stop. Seriously, stop doing it. If you're at work, leave and go home. If your home, get into the kitchen. You need to make these. It's not a matter of life or death, but it's a matter of happiness. Because these risotto cakes are happiness. Unless you eat too many like I did, then you won't be so happy.


I think risotto is a food that people tend to think is hard to make. It's not. Trust your little blogging friend- it's not. If you know how to pour liquid into a pan you can make risotto. But after you make risotto, you're often left with leftovers. And while leftover risotto is good, risotto cakes are GREAT.

The combination of crisp bread crumbs coating creamy cheesy rice is almost too much to handle. Almost. But I handled it like a champ. Here's the little catch- the risotto should be day old, or at least completely cold from the fridge. It just won't stick together otherwise. You can use any risotto you want but I think it's best to keep it a simple, cheesy risotto. My favorite one is linked below, but use whatever you like.

Just make these. They are the best thing I've made in a long time. I even immediately offered to host a dinner party just so I could make these. Anyone wanna come?! I'm cookin' these!

Source: Stephanie Cooks Original

Ingredients:
1 batch of your favorite risotto, mine being this parmesan risotto, cold (preferably day old)
2 eggs, beaten
1 1/2 cups Italian seasoned bread crumbs
Olive oil

Directions:
1- Preheat your oven to 225.

2- Coat the bottom of a large nonstick skillet with a thin layer of olive oil.

3- Place the bread crumbs on a plate next to a shallow dish with the beaten eggs.

4- Grab one handful of cold risotto and form into a round cake, slightly smaller than your palm, about 1 inch thick. Dip into the egg, then into the bread crumbs, coating both sides. Place on a large dish.

5- Repeat until all cakes are formed.

6- Heat your oil. Once it's hot, cook the cakes 4 at a time (or more- just don't crowd your pan.)

7- Once browned, flip and repeat.

8- Remove from the skillet and place on a cookie sheet in your preheated oven to keep warm.

9- Repeat until all risotto cakes are cooked.

**Leftovers can be frozen. Wrap in plastic wrap then place in a freezer safe bag or container.**

Saturday, January 29, 2011

Light Buttermilk Biscuits


A few weeks ago I made my favorite crockpot roasted chicken along with some roasted veggies. Being the carb-o-holic that I am, I couldn't simply leave well enough alone- I had to add some carbs to the meal. In passing my father mentioned that I needed biscuits with this meal and I couldn't agree more. Buttermilk biscuits it is.

The original recipe calls for rolling the dough out and cutting it with a biscuit (circle) cutter. I just wasn't in the mood. It was Sunday night, I had done nothing relaxed all day and wasn't in the mood to end the cycle. So I just grabbed a spoon and dropped the dough on a sheet. Hey- it may be lazy, but drop biscuits are wonderful, no? And wonderful these were. I could tell they were lighter, they weren't as buttery and rich tasting as traditional biscuits, but to me that's ok. John didn't know they were a lighter recipe so I guess maybe I could only tell because I knew. These will be made again and again, I assure you of that!

Source: Slightly adapted from  Weightwatchers.com

Ingredients:
1 cup all purpose flour
1.5 tsp. baking powder
1/2 tsp. baking soda
1/4 tsp. salt
2 tbsp. butter, chilled and cut into small pieces
1/2 cup lowfat buttermilk
Cooking spray

Directions:
1- Preheat the oven to 450.
2- Add flour, baking powder, baking soda, and salt in a bowl. Stir well.
3- Using a pastry cutter, or two knives, cut the butter into the flour mixture until it resembles course crumbs. (I also used my hands to really work the butter in.)
4- Knead the dough 4-5 times.
5- Using a large spoon, drop the biscuit dough onto cookie sheets covered with cooking spray (or a silpat). Bake for 10 minutes or until golden.

Yields 7 biscuits

** 3 Points Plus per biscuit, 7 biscuits total


Thursday, January 27, 2011

Tortellini Soup


When I saw that Branny was hosting this event, "Charity Souper Bowl", I knew I needed to participate. For every soup recipe people post in the comments section of that post Branny will donate $1 to the ASPCA. Pretty cool, right? I knew I had to participate. And you should participate too! You don't need a blog, just post a recipe and Branny will donate a dollar to save puppies and kitties.

I made this awesome tortellini soup and I was a big big fan. I've had tortellini en brodo, or tortellini soup, countless times at restaurants but this was my first time making it myself.  Best of all I tend to have all of these ingredients on hand so it's a quick last minute dinner idea. While John may have grumbled at the thought of eating a broth based soup for dinner he too surprisingly liked it. Sure, it didn't top broccoli and cheese soup for him, but hey- wcha gonna do?

On another note, Branny mentioned that each post for the "Charity Souper Bowl" should be dedicated to a special animal in our lives. My husband is a BIG animal lover, and part of loving John is loving these two crazy guys:
 
... Quincy and I have similar tastes in bags and pass times ::wink wink::

So if you have a soup recipe, please run over to Branny's blog and share it- every dollar helps and the deadline is the 30th of this month! 


Ingredients:
4 cups chicken broth
1 package tortellini
3 cups baby spinach
1 tomato, seeded and chopped
1/4 cup parmesan cheese
1/4 tsp. Italian seasonings
1/4 tsp. garlic powder
Salt and pepper to taste

Directions:
1- Bring the chicken broth to a boil. Add the tortellini and cook until almost cooked though.
2- Lower the heat, add the spinach, tomato, parmesan cheese, and seasonings.
3- Heat over low heat until the spinach is wilted.
4- Serve hot.

Wednesday, January 26, 2011

Challah French Toast


When I think of the Food Network personalities my favorite is hands down Ina Garten. Most of the people in my age group love Giada or Rachel Ray, and while I too love both of them and see their mass appeal, there is just something to respect about The Barefoot Contessa. Ina is, in my opinion, a classic. A woman who knows her way around the kitchen. I turn to her anytime I am looking for a classic- and sure enough, when I wanted a classic challah french toast she was my lady.

I have an old standby recipe for french toast that I make. But when I found myself with 1/2 a loaf of challah in the freezer I knew what I needed to make. And boy- Ina didn't lead me wrong. This is a pretty simple recipe but the results are anything but. It made for a perfect "brinner" or "dinfast" (yah know... breakfast + dinner... ok, I'm lame, I get it.) Definitely try this out if you're in the market for a new french toast recipe. The original definitely makes a lot- I halved it and it was still a good amount for two people. Below is the quantity I made, but if you have a large family just check out Ina's version linked below.


Source: Slightly adapted from Ina Garten

Ingredients:
3 extra-large eggs
3/4 cup milk
1/2 tsp. ground cinnamon
1 tsp. grated orange zest
1/4 tsp. vanilla extract
1/2 tbsp. honey
1/4 tsp. kosher salt
1/2 large loaf challah bread
Butter or oil (for greasing the pan)

Directions:
1-Preheat the oven to 250 degrees F.
2- In a large shallow bowl, whisk together the eggs, orange zest, milk, cinnamon, vanilla, honey, and salt. Slice the  challah in 3/4-inch thick slices. Soak as many slices in the egg mixture as possible for 5 minutes, turning once.
3- Heat 1 tbsp. of either butter or oil in a very large saute pan over medium heat. Add the soaked bread and cook for 2 to 3 minutes on each side, until nicely browned. Place the cooked french toast on a cookie sheet and keep it warm in the oven. 
4- Repeat until all the bread is cooked. Serve hot with maple syrup.

Monday, January 24, 2011

Buffalo Chicken Pizza


I've mentioned before that my husband is unhealthily obsessed with buffalo sauce. Anytime I ask him what he wants me to make for dinner he says the same thing, "Something with buffalo sauce." Now I love buffalo sauce too, so this is A-OK in my book. Plus, I much prefer to fulfill this request at home where I can prepare food with buffalo sauce that isn't as bad for you (skip the frying, not add butter to the sauce, etc.)

When we go get slices of pizza John always gets a buffalo slice. I'm telling you- the man is obsessed! I typically prefer something with a tomato based sauce, but hey- to each his own, right? In order to spice up our dinner menu (heh- get the pun? Get it? Ok... moving on) I added this pizza and am so glad I did. We both loved it. It had just the right amount of spice and was quite satisfying. Best of all it was so easy to make. My kind of meal, particularly after a long day at work.

And if you're like John and can't get enough buffalo sauce goodness, here are some things I've made in the past:
Buffalo shrimp
Buffalo chicken wraps
Baked buffalo chicken tenders (My most googled recipe!)
Buffalo shrimp quesadillas

Source: Stephanie Cooks Original

Ingredients:
1 pizza crust (homemade or pre-made, your choice)
3 oz. cooked chicken (1 small breast), cooked and chopped small
3 tbsp. ranch salad dressing
6 tbsp. buffalo wing sauce, like Frank's, divided
3/4 cup mozzarella cheese

Directions:
1- Preheat the oven (and your pizza stone if using one) to 450 degrees.
2- If using homemade crust, form your crust into a circle.
3- In a small bowl, combine the 3 tbsp. ranch salad dressing with 3 tbsp. buffalo sauce, stir well to combine.
4- Spread the ranch/buffalo mixture over the crust evenly.
5- Add the chicken to the small bowl. Top with 2 tbsp. buffalo wing sauce and toss to coat.
6- Place chicken evenly over the crust/sauce.
7- Top with cheese. Drizzle with the remaining tbsp. of wing sauce (or more to taste).
8- Bake 12-15 minutes, or until cheese is melted and the crust is golden crisp.

Saturday, January 22, 2011

Cake Batter Cookies


Remember when I posted this cake batter bark? Well if you don't you should REALLY check it out- it's so stinkin' good. That recipe called for a teaspoon and change of cake mix, leaving me with a big (almost) full box of cake mix. Of all the things to stress about in life this certainly did not top my list- I can always find a use for cake mix.

Enter these cookies. My husband has a bit of a cookie problem and eats them faster than anyone I know, so keeping cookies in the house is never a problem for me because they are often gone before I go to get some. These cookies were exactly as I expected- delicious with a subtly cakey vanillay taste. (Do you notice I like to add the letter "y" to words? Who knows... let's just go with the flow on this one.) I liked how soft and fluffy they were and the chocolate added a nice contrast to the mix. You can get crafty here and use any flavor cake mix you want- I used yellow- but whatever you have will work.

Source: All Recipes

Ingredients:
1 box cake mix
1 tsp. baking powder
2 eggs
1/2 cup vegetable oil
1 cup semisweet chocolate chips

Directions: 
1- Preheat oven to 350 degrees F (175 degrees C).
2-In a medium bowl, stir together the cake mix and baking powder. Add eggs and oil, then mix until well blended. (It was a bit crumbly for me so I used my hands to really mix it well- it's not as smooth as typical dough.)
 3-Stir in chocolate chips, or your choice of additions. Drop by rounded spoonfuls onto cookie sheets.
4- Bake for 10 minutes in the preheated oven.  Allow cookies to cool on baking sheets for 5 minutes before transferring to a wire rack to cool completely.

Friday, January 21, 2011

Parmesan Garlic and Herb Croutons


I make light caesar salads as a side dish often. Very often. I don't do anything fancy- just romaine, some parmesan, and a high quality light caesar dressing. Oh- and croutons. Yes- croutons are a must. Only I recently ran out of croutons and kept forgetting to buy them, so we went weeks with coutonless salads- a real cryin' shame.

I realized that enough was enough and it was time to make some croutons. There's really nothing easier in the world- so why not, right? I didn't follow a recipe- I just chopped, tossed, baked, and then ate. Yum- eating these was the best part!


These croutons came out fabulous. I was pleased with how nicely they turned out. And best of all they are much healthier than store bought ones because I used  multigrain bread, less oil, and baked them instead of frying. I will never buy store made croutons again. Oh, and by the way- if you choose to snack on these instead of putting them in a salad, I won't judge you. I promise.


Source: Stephanie Cooks Original

Ingredients:
1/2 loaf good quality Italian bread, multigrain preferred
3 tbsp. extra virgin olive oil
1/4 tsp. garlic powder
1/4 tsp. Italian seasoning
1/4 cup grated parmesan cheese
Salt and pepper

Directions:
1- Preheat the oven to 350.
2- Line a cookie sheet with a silpat or parchment paper.
3- Taking the  bread, slice it in half horizontally. Then slice each piece in half vertically, so you have four long, thin slices of bread.
4- Cut the four bread pieces into even cubes, placing into a large mixing bowl- set aside.
5- In a small bowl combine the EVOO, garlic powder, Italian seasonings, and a dash of salt an pepper. Stir well.
6- Slowly drizzle the mixture over the bread cubes, stirring well. Continue pouring until all of the mixture is on the bread. (The bread cubes should be saturated in places, but they do not need to be completely covered in the mixture).
7- Toss in the parmesan cheese, stir well.
8- Spread the bread cubes out in a single layer on the sheet. Bake 15 minutes, remove from the oven, and stir well.
9- Bake another 15 minutes. Again, remove from the oven and stir well. At this point if they are hard and crisp, leave them out to cool. If not return to the oven for 10 minutes or so.
10- Allow the croutons to cool completely before storing in an airtight container.

Wednesday, January 19, 2011

Pasta with Slow Roasted Vodka Sauce


... aka "Pasta alla Vecchia Bettola." But I like to keep things simple, so I'm gonna go with slow roasted vodka sauce, 'k? Great.

This past week NJ got hit with a lovely snow storm that closed school. While most people were probably excited to sleep in, or catch up on their DVRd shows, or read a good book, I was excited to make this recipe. I had it bookmarked but knew it was a bit time consuming, so I was saving it for a day I had time to play around in the kitchen. This recipe is EASY to make- the oven does all the work for you, but it is time consuming.

The verdict?! Well worth the time. I loved it. Slow roasting the tomatoes really brings out the flavor and adds a level of depth to the sauce. The sauce came out a bit thick, and I could have thinned it out with more cream but I didn't want to add the extra fat. Next time I'd puree the tomatoes more in my food processor to thin it out. Even with it thick it was delicious. My only regret? Halving the recipe. I wish I made the whole thing and froze half the sauce! It's that good.

Source: So Tasty, So Yummy
Serves 4-6

Ingredients:
¼ cup good olive oil 
1 medium Spanish onion, chopped 
3 cloves of garlic, diced 
½ teaspoon crushed red pepper flakes 
1 ½ teaspoons dried oregano 
1 cup vodka 
2 (28-ounce) cans peeled plum tomatoes 
Kosher salt 
Freshly ground black pepper 
1 pound ridged pasta
4 tablespoons fresh oregano (can substitute 1 tbsp. dried)
¾ to 1 cup light cream 
Grated Parmesan cheese 


Directions:


Preheat oven to 375 degrees F. 

Heat the olive oil in a large oven proof saute pan over medium heat, add the onions and cook for about 5 minutes until translucent. Add the garlic, red pepper flakes and dried oregano and cook for 1 minute more. Add the vodka and continue cooking until the mixture is reduced by half. 

Meanwhile, remove the tomatoes from the juice in the can and crush them into the pan with your hands. Add 1 teaspoon salt and a pinch of black pepper. Cover the pan with a tight fitting lid and place it in the oven for 1 ½ hours. Remove the pan from the oven and let cool for 15 minutes. 

Meanwhile, bring a large pot of salted water to a boil and cook the pasta al dente. Drain and set aside. 

Place the tomato mixture in a blender and puree in batches until the sauce is a smooth consistency. Return to the pan. 

Reheat the sauce, add 2 tablespoons fresh oregano and enough heavy cream to make the sauce a creamy consistency. Add salt and pepper, to taste, and simmer for 10 minutes. Toss the pasta into the sauce and cook for 2 minutes more. Stir in ½ cup Parmesan. Serve with an additional sprinkle of Parmesan and a sprinkle of fresh oregano on each plate.

Monday, January 17, 2011

Cinnamon Sugar Almonds


Confession: I pack my husbands breakfast and lunch for work, daily. Don't hate on me- I like doing it. I just like the process of making his food and knowing he has some yummyness to eat during the day.

 I love Costco's nut trail mix and often add it to John's lunch. It's easy, nutritious, and high in good fats. However, John recently begged, pleaded, and urged asked me to lay off the trail mix for awhile- apparently he's sick of it. Meh.

Even so,  I really wanted him to have some form of nuts so I decided if Costco wasn't cutting it for him anymore I'd make my own variety of nuts and see if he liked it. Sure enough, these were a winner. And really, how could they not be? They are sweet, crunchy, and delicious. They also make your house smell like an amazing cinnamon scented candle while they cook. I made the whole recipe and stored them in an airtight container so these will last awhile. Best of all it's much cheaper than buying the fancy almonds at the grocery store!

Source: Divine Bites

Ingredients:
4 cups almonds
1 egg white
1 tsp. vanilla
1/2 cup granulated sugar
1/2 cup brown sugar
2 tsp. cinnamon
1/2 tsp. salt

Directions:
1- Preheat the oven to 250.
2- Line a cookie sheet with parchment paper or a silpat.
3- Combine cinnamon, sugars, and salt in a bowl, mix well.
4- In another bowl whip the egg white and vanilla until it's foamy and thick (but do not let it form stiff white peaks). 
5- Add the almonds to the egg whites and stir well. Sprinkle sugar mixture over the almonds and stir to coat.
6- Spread evenly in a single layer on a baking sheet. Bake for 1 hour, stirring every 15 minutes. 
7- Allow to completely cool, then store in an airtight container. 

Saturday, January 15, 2011

Pan-Roasted Garlic and Lemon Chicken


Growing up breaded chicken cutlets were on the menu almost weekly. I have probably eaten more breaded chicken cutlets than any other food in my life. My mom had a tough job as the cook in our house- nobody ate the same foods. So when she found something we'd eat she stuck with it. Can you blame her?

The other day I was in the mood for breaded chicken. It just sounded good. And since I make breaded chicken once a month, maybe, I decided to go all out and cook this the good way- with oil on the stove. Oh babbbyyyyyy. Go big or go home.


This chicken was awesome. Simply put, it's awesome. (I read recently that you should never use the word "awesome" to describe food- it's not descriptive... well pshhh, I'm ignoring that- it's AWESOME.) I loved the lemon taste, it was nice and fresh. It offered a light contrast to the breaded crust. This is just a great way to spruce up breaded chicken and to me that's exciting.
... Juicy lemon-  be still my heart...

Source: Elly Says Opa!
Ingredients:

2 Tbsp. olive oil
2 fat cloves garlic, peeled and slightly smashed
1 lemon, halved
1 egg
1/3 cup breadcrumbs
2 Tbsp. romano or parmesan cheese
1/2 tsp. chopped rosemary
2 chicken breast halves, pounded to about 1/3 – 1/2″ thickness
Directions:
Heat a nonstick skillet over medium-low heat and add the oil.  Once the oil is hot, add the garlic and cook, stirring occasionally, until golden brown and soft, about 7 minutes.  Remove the garlic with a slotted spoon, and keep the oil in the pan.
Zest half the lemon into a dish or bowl, and to it add the breadcrumbs, cheese, rosemary, and salt and pepper to taste.
Crush the browned garlic cloves and whisk in a separate shallow bowl/dish along with the egg and juice from half the lemon.
Season the chicken with salt and pepper.  Dip the chicken into the egg mixture, and then dredge into the breadcrumb mixture.
Heat the garlic oil over medium heat and once hot, add the chicken.  Cook until done, about 2.5  minutes per side.  Serve with slices or wedges of the remaining half lemon.

Thursday, January 13, 2011

Chocolate Chip Cookie Dough Dip


**Today begins my final facebook fan page blog giveaway, and it's by far the one I'm most excited to be giving. Make sure you follow my fan page here, hit "like" and answer the question of the day. Contest ends at midnight tomorrow (Friday, January 14)!**

Now that that's out of the way, can we get to that dip up there?! Yes, puh-lease, let's.

I made this dip years and years ago to take to a friend's house and I remember thinking "This is what people rave about?! This stuff?! Really?!" I loved the idea- I really did- but the taste was wrong to me. It tasted too much like cheesecake to call itself cookie dough dip. And yet, years later, I still have longed to try it again but a little differently. I thought of options- pudding, less cream cheese, more sugar... hmmm, what to do...  Enter Cool Whip.

I made this for Christmas Eve and Christmas day. It was a hit at both locations and people were eating it like crazy. I personally ate my weight in dip, and someone else's weight in dip too. But hey, my pants still button (barely...) so who cares, bring on the dip!!

For me the Cool Whip is essential. It makes it lighter and fluffier, it cuts the cream cheese taste, and it makes my soul cry out in joy. If you like that cheesecake taste, hey- leave the Cool Whip out- it's up to you. But me, yeah, I use it.

Source: Adapted from Food.com

Ingredients:
1/2 cup butter
1/3 cup brown sugar
1 tsp. vanilla extract
1 8oz. package cream cheese
1/2 cup confectioners' sugar
3/4 cup mini chocolate chips, plus more for topping
1/2 tub Cool Whip

Directions:
1. In a small saucepan, melt the butter with the brown sugar over medium heat. Stir continuously, until the brown sugar dissolves.
2- Remove from heat, stir in the vanilla.
3- Beat the cream cheese and confectioners' sugar for 1 minute.
4- Stir in the cooled butter mixture and beat again for another minute.
5- Stir in the chocolate chips. 
6- Fold in the Cool Whip until evenly dispersed. 
7- Pour into a bowl. Top with additional chocolate chips, if desired.
8- Refrigerate at least 1 hour. Remove from fridge at least 15 minutes before serving.
9- Serve with assorted small cookies (Nilla Wafers, Teddy Grahams, animal crackers, etc.)

Wednesday, January 12, 2011

Ravioli with Brown Butter Sage Sauce


This post is a bonus post- woo hoo! I pretty much stick to my regular blogging schedule of every other day, but I have an insane surplus of recipes to blog and I am so excited to share them with you. Not to mention today is a SNOW DAY (every teachers' fave) so I figured why not  post a little ol' bonus for you?!

I am obsessed with Trader Joe's (like... obsessed...) but there isn't one locally so I only go every now and then. When I was there last I got a package of sundried tomato and goat cheese ravioli. I put them in the fridge and instantly began thinking of what kind of sauce to use. Regular ol' marinara would have worked, but I wanted something that wouldn't mask the flavor of the goat cheese and sundried tomatoes. Instantly I knew I needed to make a brown butter sage sauce so I dug through my gigantic recipes-to-try file and grabbed this sauce.

Was it good? OH YES it was. I moaned, I groaned, I begged John to tell me I was the best cook he had ever met. Ooops, maybe I took sharing too far... hmmm... But anyways, this sauce was to die for. My only "issue" if you will is that when I added the parmesan it didn't incorporate as well as I'd have liked and the sauce was speckled with white cheese. Did it affect the taste? No- not at all. But the look was meh. Next time I'd use freshly shaved instead of grated cheese- that'll solve the problem.


Source: Sauce slightly adapted from Mario Batali

Ingredients:
4 tbsp. butter
1/4 tsp. sage
1/2 lemon, juiced
1/4 cup parmesan cheese (grated or freshly shaved)
Ravioli (or pasta of choice)

Directions:
1- Bring a pot of water to boil, add the pasta, and cook according to packaging directions.
2- Meanwhile, in a small saucepan add the butter and melt until it begins to brown in the shallowest places. Watch it closely- you don't want to burn your butter.
3- Add sage, remove from the heat.
4- Add lemon and parmesan, stirring well.
5- Pour the sauce over the ravioli, or pasta of choice, and serve hot.

Tuesday, January 11, 2011

Garlic Ginger Glazed Carrots


A little fact about me- I love cooked carrots but you can't pay me to eat a raw carrot. (Well... maybe you could pay me, depending on the amount you're forking up...) I love how sweet and tender cooked carrots are... yummo.

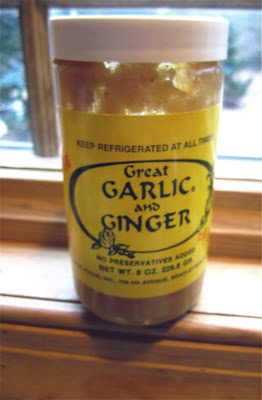
On Christmas my mom and I were laughing about the fact that she had three huge bags of carrots and no need for this. Clearly my mom has a carrot shopping problem- poor mama. With that in mind we decided to add carrots to the menu at the last minute. I quickly looked through my parents' cabinets, grabbed some ingredients, and whipped these up. I personally loved them and they went over very well. I loved the flavors and I loved how easy they were to make. I was also EXTREMELY jealous of my parents for having this awesome ingredient in their house:
Unfortunately they have no idea where they got it... boo. I haven't seen it in my food stores, but now my eyes are peeled. 

Definitely worth trying- it's a different kind of side dish and if you're anything like me variety on the side is as important as variety in the main dish.

P.S.- My most recent blog giveaway, a 1 year subscription to Cooking Light Magazine, is up on my facebook fan page. The last chance to enter is tonight at 10 (EST). Make sure you "like" me on facebook and answer the question of the day. Be sure to look for one more giveaway Thursday!

Source: Stephanie Cooks Original

Ingredients:
6-7 carrots, peeled and sliced into even rings
1 tbsp. olive oil
2 tbsp. crushed garlic and ginger (or 1 tbsp. each)
1.5 tbsp. butter, softened
1 tbsp. honey
Salt
Pepper
Parsley

Directions:
1- Heat a large skillet with the oil over medium high heat.
2- Add the garlic and ginger, allow to heat for about 1-2 minutes.
3- Add the carrot rings. Cook for about 20 minutes, until tender, stirring frequently.
4- Once the carrots are tender, combine the butter and honey in a small bowl. Add the honey butter to the skillet, stirring to coat.
5- Season with salt, pepper, and parsley to taste

Sunday, January 9, 2011

Crockpot Pulled Chicken


John and I spent a weekend in Washington DC a few years ago and stayed at a really nice hotel right next to the White House. Our hotel had a great roof top restaurant with a view of the White House roof and lawn. It was interesting eating and watching all the men with huge guns on the roof a short distance away. Now before you wonder where I'm going with this seemingly unrelated story, let me tie it in for you. When we were there John ordered a pulled pork sandwich- something I had never seen him eat before. That man is truly a man of mystery I'm telling you- I learn something new daily!

That event wasn't overly memorable and truly I hadn't given it much thought until I saw this recipe on a blog. It instantly reminded me of our lovely weekend away and I knew I'd give it a shot. Plus, it has chipotles in adobo in it which has quickly become one of my favorite ingredients ever. John loved the sandwiches and was thrilled to have them. They were smoky, saucy, and tender. Delicious.

Best of all- I continued with my New Year's resolution and repurposed the leftovers instead of tossing them. I halved this recipe and there was still a ton left so I used the leftover meat to make chicken tacos. I figured the chipotles in adobo would give it a flavor that worked for tacos and it surprisingly did! Big fan of not wasting food- big fan. Let's hope I can keep it up!

**Don't forget to follow me on facebook- the first giveaway ends Sunday (TODAY) at noon (EST) but there will be another giveaway Monday and one on Thursday! 

Source: Apple A Day

Ingredients:
1 (14 oz.) can tomato sauce 
2-3 chipotle chiles in adobo, finely minced
 
1/4 c. cider vinegar
 
3 TBSP honey
 
1 TBSP plus 2 tsp. sweet or smoked paprika

2 TBSP tomato paste
2 TBSP Worcestershire sauce 
3 tsp. dry mustard
 
1 TBSP chili powder
 
1 tsp. salt
 
3 lbs. boneless, skinless chicken thighs or breasts trimmed of fat 

1 medium onion, chopped 
3 cloves garlic, minced
 

Directions:

1. Stir tomato sauce, chiles, vinegar, honey, paprika, tomato paste, Worcestershire sauce, mustard, chili powder and salt in a 6-quart slow cooker until smooth. Add chicken, onion and garlic; stir to combine. 


2. Put the lid on and cook on low until the chicken can be pulled apart, about 5-6 hours.

3. Transfer the chicken to a cutting board and shred with a fork. Return the chicken to the sauce, stir well and serve. Serves 8-10.

Saturday, January 8, 2011

3 Blog Giveaways!

So I've told you before, I am eternally grateful and constantly humbled by your support, emails, comments, and love. In my efforts to repay you for a bit of that support I will be hosting three, yes THREE, blog giveaways this week on my Facebook fan page, located HERE!

In order to enter you have to follow me on facebook by clicking "like" on the page at the top. All details for the giveaways will be posted on my facebook page. I will be listing the giveaway items starting today, another on Monday, and the final one on Thursday.

The rules (yes, there are rules, sorry):
1- You must be a continental US resident.
2- Only one entry per person per giveaway.

Winner will be selected at random using random.org.

So what are you waiting for?! Go "like" me on Facebook RIGHT NOW! Details will be coming out shortly on the facebook page about the giveaway!  Remember, all you have to do is click here and hit like!

Friday, January 7, 2011

Mini Chocolate Chip Pecan Loaf Cakes


This year for Christmas I made a list of wish items... and all of them involved the kitchen. Donut pans, an immersion blender, mini loaf pans... the list goes on. Oh- I also requested that cute little pink cupcake stand in the picture- why not, right?! My mom got me the mini loaf pan (among many other great items) and I immediately got to work on coming up with a mini loaf cake recipe.

John recently went snowboarding and I decided to make these little loaves for him to take with him for him and his friends. They received nothing but praise according to John. (One of his friends who always makes anti-marriage jokes even said, "Maybe marriage isn't so bad" after tasting one of these. Now THAT'S a compliment!) I tasted just a bite of one, to make sure I wasn't poisoning his friends, and I was quite pleased with the results. They were soft and fluffy. I loved the combo of the chocolate and pecans. And best of all, in the mini loaf pan you can make little individual servings. Instant portion control my friends. Who says I'm not being mindful of New Year's resolutions?

Source: Adapted from The Amateur Gourmet


Ingredients:
1 cup sugar
2/3 cup plain or vanilla yogurt
3 large eggs
1 3/4 cups all-purpose flour
1 1/2 teaspoons baking powder
1/4 teaspoon baking soda
1/4 teaspoon kosher salt
2/3 cup unsalted butter, melted
1/2 cup chocolate chip
1/2 cup chopped pecans

1- Preheat the oven to 350. Grease a mini loaf pan (8 slots) or a regular loaf pan.
2- Using a whisk, whisk together the sugar and yogurt. Add the eggs, one at a time, and whisk until completely combined.
3- 3. In a separate bowl, mix together the flour, baking powder, baking soda, and salt. Add the dry mixture into the wet and mix until just combined.
4. Using a spatula, fold in the melted butter a little at a time. Fold in the chocolate chips and pecans.
5. 5. Scrape the batter into the prepared pan. If using a mini loaf pan, bake 20 minutes or until a toothpick comes out clean. If using a regular loaf pan bake 50-55 minutes, until a toothpick comes out clean.
6. Allow the cake to cool in the pan for 5 minutes before turning it out onto a wire rack to cool to room temperature, right side up. 


Directions:

Wednesday, January 5, 2011

Spinach Dip Chicken


Unlike the rest of the world, I didn't resolve to lose weight this year come January 1. My food related resolutions were simple: cook more/waste less. I have thrown out full pounds of chicken more than once many times because I let it sit too long. Oh and forget leftovers- if I had a little bit of this or that leftover I'd dump it (after it sat forever, with me promising myself that THIS time was different- I'd use it!). Now I am trying to really repurpose my leftovers and not waste. We'll see- so far so good (yet... it's only been 4 days...)

This chicken was an example of my efforts to waste less. I had made spinach dip for Christmas and had a tiny bit left in the fridge. I decided to repurpose it as a topping for chicken and boy am I glad I did. This was a hit in our house! Surely you can use any spinach dip you have- you don't need to use my recipe- but if you do that's even better ::wink wink::

The best part of this dinner is that it's easy. Bread the chicken, bake it, top it, bake it, eat it. If I find myself left with dip again I know what I'm making- so yummy.

Source: Stephanie Cooks Original (Inspired by Oishii)

Ingredients:
2 thin chicken breasts
1/3 cup panko (or bread crumbs)
1/8 tsp. garlic powder
1 egg
Cooking spray
1/2 cup spinach dip (or any variety you have)

Directions:
1- Heat the oven to 350.
2- In a bowl, beat the egg.
3- On a separate plate combine the panko (or bread crumbs) and garlic powder.
4- Dip the chicken in the egg, then in the breading.
5- Place in a dish that's been sprayed with cooking spray. Lightly cover coated chicken with cooking spray.
6- Bake for 10 minutes.
7- Remove from the oven, top with the spinach dip. Return to the oven- bake until chicken is cooked through and the dip is hot.

Monday, January 3, 2011

Flaky Spinach Dip Bites


Before we get down to business, have you "liked" me on Facebook yet?! NO?! Well, get on it! Click HERE and then hit "like."

So now that that's out of the way, let's get to the deliciousness that is above. I volunteered to bring an appetizer on Christmas and I was really raking my brain. I couldn't decide between making spinach dip (which I make constantly for every event) or a hot appetizer. I went back and forth. I wrote pro's and con's lists and pondered the benefits of both...

I kid, I kid.

Then, like a sign from above, I decided to combine the two and do BOTH in one! Ah, so smart sometimes. I decided to change up my spinach dip a bit because I didn't think my go-to recipe would work hot. This dip worked really well! I was a fan and really liked how it came out. The best part is that it's so easy, yet they look impressive. That's my idea of a quality recipe.

It makes a lot of dip, so if you don't need that many bites save the dip, heat it up, and dip some chips in it! Or wait until later this week when I post a chicken recipe using the leftover dip- so good.


Source: Stephanie Cooks Original

Ingredients:

Dip:
10 oz frozen spinach, defrosted
8 oz. frozen artichoke hearts
3 oz. cream cheese, softened
8 oz. sour cream
1 cup shaved or shredded parmesan cheese (not grated powder)
1/4 tsp. garlic powder
1/4 tsp. onion powder
Salt and pepper (to taste)

Mini phyllo shells (in the grocery store freezer)

Directions:
1- Squeeze the liquid out of the spinach, place in a large bowl.
2- Dice the artichoke hearts into small pieces while they're still somewhat frozen (it's easier to cut frozen). Toss in with the spinach.
3- Add the cream cheese. Using a spoon, smush the cream cheese into the artichokes and spinach until well combined.
4- Add the sour cream, parmesan cheese, and seasonings. Stir well to combine.
5- Transfer to an oven safe dish. Refrigerate at least 1 hour (can be done overnight too).
6- Heat the oven to 350.
7- Heat in the oven for 10-15 minutes, until just warm and beginning to melt. (If you're using it as just a dip keep it in until bubbly and hot.)
8- While it's in the oven, place the mini phyllo shells on a cookie sheet.
9- Remove from the oven. Using a tablespoon, fill each shell with dip.
10- Heat in the oven for 5-6 minutes, until filling and shells are hot and golden.

Sunday, January 2, 2011

Stephanie Cooks 2.0

Welcome to the NEW AND IMPROVED Stephanie Cooks. If you read my blog through a reader (like Google Reader) then you aren't seeing any of the new changes, but please visit my blog HERE and check it out.

Some exciting changes are that it's much cleaner. The archives and labels are now pull down menus so they aren't hogging up my blog. I also have three functioning columns now- woo hoo! I added some tabs with new sections to the top- check them out. And best of all- my new header. The girl looks like me! Yay!

I cannot rave enough about Samantha's Day. Working with her was beyond wonderful. I had a lot of questions, a lot of changes I wanted, and everything was done quickly- at points within minutes (and I literally mean minutes). We started communicating 5 days ago, today we began finalizing the design- and tonight the new and improved blog has been launched. Her services are so reasonable- she is worth every penny she charges and then some. If you are in the market for a new blog design and you go through blogger, please check her out.

I hope you enjoy the new and improved Stephanie Cooks- I sure do!

Saturday, January 1, 2011

Crispy Skillet Potatoes


Happy New Year loves. May 2011 bring you all nothing but happiness!

I'm in love. Hopelessly, undyingly, in love with these potatoes. Now now, I see you. YES YOU! You're scratching your head, curling up your lips, and going "Um. Get a grip woman. It's potatoes. Show me chocolate and I'll buy that you're in love..." But I'm telling you- these are BETTER than chocolate. Ok, now I'm going nuts- nothing is better than chocolate- but these are pretty stinkin' close.

You see, I'm a big fan of french fries. How 'bout you? LOVE those crispy fried, horrible for you potatoes? Yes, me too. But I don't love clogging my arteries often, so I needed to find a way to achieve that love for crispy potatoes without throwing them in a deep frier. And I did- I did! Oh how I did.

The key to this is recipe is a non-stick skillet. It's essential. Without it, this just won't work. You need the nonstick to allow for them to cook for so long with so little oil. If you use a stainless steel skillet you'd need far more oil, and that would defeat the purpose. So get out your trusty nonstick skillet, grab some spuds, and get moving! You can't go another week without these.

Source: Stephanie Cooks Original

Ingredients:
2 medium red skin potatoes
2 tsp. olive oil
1/8 tsp. salt
1/4 tsp. garlic powder
1/4 tsp. onion powder
Pepper to taste

Directions:
1- Scrub your potatoes clean. Dice into small, even pieces.
2- Place in a pot, cover just to the top of the potatoes with water. Bring to a boil. Cook until fork tender, about ten minutes.
3- Drain and set aside.
4- In a nonstick skillet heat the oil.
5- Add the potatoes and the seasonings, toss to coat, and then leave them alone for 5-7 minutes over medium heat. Do not flip or stir.
6- Flip the potatoes and allow them to sit another 5-7 minutes.
7- Check that all sides are golden and crisp. If not, continue allowing the potatoes to sit in the oil over the heat until golden and crisp.