Showing posts with label bread/biscuits. Show all posts

Monday, November 25, 2013

Skillet Focaccia Bread


Until recently I really feared working with yeast. I had done it several times in my life but it was definitely my least favorite kitchen project. After making cast iron pizza I became a convert and decided I needed to use yeast more. I recently found myself home unexpectedly for the day on a Sunday, our dinner plans cancelled, and no real meal plan in mind. I was craving cavatelli with marinara but wanted to make something to "spice" up dinner and make it more fun. Enter this focaccia.

I started out with intentions of making a loaf of Italian bread but stumbled upon this and decided I needed it in my life. Anything I can make in my Le Creuset skillet becomes an instant favorite so I was sold. This came together so easily, really taking minimal effort, and the bread was incredible. I followed the original recipe to a T but next time I might mix up the toppings. I love oven roasted tomatoes and shaved parmesan baked into focaccia so I can pretty much assure you that'll be my next rendition. John and I both loved this bread- John even ate it with just about every meal for the following two days. Landon, however, wouldn't even try it which is so odd since typically he sees bread and he is so sold! Toddlers... the least predictable species on the planet.

Source: Crunchy Creamy Sweet

Ingredients:
3/4 c warm water
1/2 tsp granulated sugar
1 1/2 tsp yeast
2 Tbsp olive oil
2 c all-purpose flour ( divided )
1/2 tsp salt

For the parmesan butter brush:
3 Tbsp unsalted or salted butter, melted
2 Tbsp grated parmesan
1/2 tsp Italian seasoning

Directions:
1- Place water and sugar in a large mixing bowl of a stand mixer. Stir until sugar dissolves.
2- Sprinkle yeast over the water and stir few times. Let sit until foamy ( about 5 minutes).
3- Turn the mixer on low speed and add 1 cup of flour and salt. Mix until combined.
4- Add oil and mix well.
5- Gradually add as much of the remaining cup of flour as you can ( it can be only 3/4 of it) and mix until the dough pulls away from the sides of the bowl.
6- In the meantime, preheat the oven to 220 degrees F and when it's ready turn it off. Keep the door closed.
7- Grease the skillet (I used olive oil).
8- Place dough onto a floured surface (use the remaining flour from the second cup) and fold the dough few times until you feel it's smooth and not sticky anymore. Shape into a ball.
9- Roll out the dough into a size of your skillet.
10- Place in skillet. Stretch up the sides. Cover with a kitchen towel and place in the oven for 20 minutes.
11- Take the skillet out of the oven and preheat the oven to 400 degrees F. Make indentations in the dough with your fingers.
12- Mix melted butter, parmesan and seasoning in a small bowl. Brush the dough with half the butter.
13- Place skillet with dough in the preheated oven and bake 20 minutes, or until golden brown. Brush with remaining butter. Let cool until safe to the touch and slice. Serve.

Thursday, September 5, 2013

Cheese Stuffed Breadsticks


As I sit down to write this post I can already tell you it's going to be short. I started teaching again this week and I am exhausted. On top of the back to school routine setting in I feel horribly sick today, so don't mind my pity party for one, but I am keeping things short. I have been meaning to share these delicious breadsticks with you because they are seriously heavenly. Straight up heaven. When I made them I served them with just a simple pasta and salad, and honestly I should have just done salad because John and I were all about the breadsticks. I ate one, took a bite of a second and then gave it to John, and literally I said "I instantly regret giving you that..." because it was so good I didn't want to share. You must try these. They are so delicious and so easy to make!

Source: Adapted from Weary Chef

Ingredients:

2¼ cups baking mix (like Bisquick), plus a little for dusting
⅔ c. milk
1 tsp. Italian seasoning
½ tsp. kosher salt
1/2 tsp garlic powder
1/2 tsp parsley
2 tbsp. olive oil
8 pieces of string cheese

Directions:
1- Preheat oven to 450 degrees.
2- Stir together baking mix, Italian seasoning, and salt. Add milk, and stir to combine.
3- Generously dust work surface with baking mix. Turn out dough, and knead about 15 times. Shape into a ball, then roll into a ¼” thick rectangle.
4- Cut dough into 8 smaller rectangles. Place a cheese stick in the center of each piece of dough, and fold the dough around the cheese. Stretch the dough as needed to entirely cover the cheese, and squeeze the entire breadstick, including the ends, to seal all edges.
5- In a small bowl combine the garlic powder, parsley, and oil. Brush the mixture over the breadsticks.
6- Place on a baking sheet and bake for 12-15 minutes, until lightly golden.
7- Serve with sauce. (Warning- the cheese will be hot, so allow to cool a bit before biting in).

Monday, August 12, 2013

Italian Crescents


Let me just tell you, my husband can completely kill a can of crescents on his own. I mean, I can make them, walk away, and he'll be done... fast. So the other day when I found a can in my fridge that had originally been bought for some purpose that I've forgotten (yet another meal plan item I didn't make I suppose!) I decided to use them to make a simple side dish. This was similar to a garlic bread type of roll, and it was truly delicious. I managed to sneak one or two away from John before he housed them all! Try these- you can easily substitute any seasonings you prefer for what I used and make a delicious side dish.

Source: Stephanie Cooks Original

Ingredients:
1 tube reduced fat crescents (or regular)
1/4 cup Parmesan cheese
2 tbsp melted butter
1/2 tsp garlic powder
1/4 tsp Italian seasonings
1/4 tsp parsley
Salt

Directions
1- Preheat the oven to 375.
2- Roll the dough out into 8 triangles. Evenly sprinkle the cheese over each triangle.
3- Roll up into crescent shape.
4- Meanwhile, combine butter and seasonings.
5- Use a pastry brush to brush butter over all rolls evenly.
6- Bake 8-10 minutes or until golden.


Wednesday, June 26, 2013

Ice Cream Bread


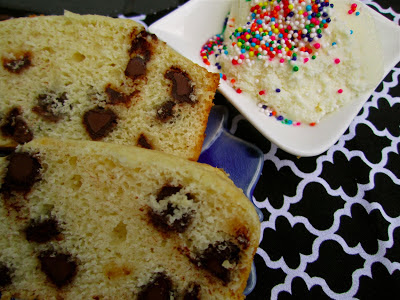
Last night I was sitting on the couch when my friend Lisa posted a picture of a bread she made and said if you'd never heard of ice cream bread to immediately google it. Well, those are directions I can handle... so I immediately googled and was drooling. Bread... made out of ICE CREAM. My mind was blown. BLOWN. I was just about to play a game with John and I made him wait while I ran to the kitchen to start this bread. I couldn't wait to make it, then once I made it I couldn't wait to taste it, and once I tasted it I couldn't wait to share it with you! Typically when you see a recipe on this blog it's something I made weeks ago in my kitchen... but not this bread. No, this had to be shared the next day.


It tastes like the most amazing muffin you've ever eaten. I made a small batch- three mini loafs- but never again will I make such a small batch. The recipe I'm posting below is for a larger batch, big enough for a loaf pan. I used vanilla because that's what I had but you could use any flavor! You could mix in anything- Oreos, chocolate chips (my choice), bananas, blueberries, peanut butter chips, etc. Just go make this- now. It's to die for.

Source: Adapted from Taste of Home

Ingredients:
2 cups softened ice cream (I used vanilla)
1 1/2 cups flour
2 tsp baking powder
1/2 tsp salt
Mix ins of your choice, optional (chocolate chips, sprinkles, fruit, crushed Oreos, etc.)

Directions:
1- Preheat the oven to 350. Grease a loaf pan.
2- In a small bowl combine the flour, baking powder, and salt. Stir well. Add the ice cream and mix well until a dough forms.
3- Gently fold in mix ins.
4- Transfer to greased loaf pan. Bake 30-35 minutes, until golden and a toothpick inserted in the center comes out clean.
5- Cool completely, then remove from the pan.

Monday, August 22, 2011

Best Banana Bread...Ever


Banana bread isn't something I typically get all excited about. I mean, it's good, but it's not something I'd ever write home about. Until now. Oh.My.Goodness. This bread has changed that for me. I had two bananas decomposing quite ripe on my counter so I decided to throw this together. I wasn't really expecting much, because as I mentioned before banana bread is pretty standard. This recipe really takes it to a new level. Is it the fact that there is a TON of sugar in it (hello- white sugar, brown sugar, and honey)? Yes.. most likely. This bread was moist and the cinnamon crumb topping was amazing. I had a slight issue (or mental break down involving me needing to leave the room- I blame the pregnancy hormones, don't judge me...) getting the bread out of the pan. I didn't spray the pan enough and the bottom stuck a bit, so when I tried to manhandle it out the crumb topping kind of shattered... resulting in me getting abnormally dramatic. Lesson? Spray your pan. Well. Like, really well. And then let your husband take it out of the pan while you pout in the corner. Yup... I'm not proud of my behavior, but I am proud of this bread- so make it!


Source: Bon Appetit

Ingredients:
1 1/2 cups all purpose flour
1 cup plus 2 tablespoons sugar
2 teaspoons ground cinnamon, divided
1 teaspoon baking soda
1/2 teaspoon salt
1 cup mashed ripe bananas (2 to 3 medium)
2 large eggs
1/2 cup vegetable oil
1/4 cup honey
1/4 cup water
2 1/2 tablespoons (packed) golden brown sugar


Directions:
1- Preheat oven to 350°F. Butter and flour 9x5x3-inch metal baking pan (or use nonstick spray- a lot of it). 
2- Whisk 1 1/2 cups flour, 1 cup sugar, 1 teaspoon cinnamon, baking soda, and salt in medium bowl. Whisk next 5 ingredients in large bowl until smooth. Add dry ingredients; stir to blend. Transfer batter to pan. Mix 2 tablespoons sugar, 1 teaspoon cinnamon, and brown sugar; sprinkle over batter.
3- Bake bread until tester inserted into center comes out clean, about 1 hour. 
4- Cool bread in pan 30 minutes. Turn pan on its side; slide out bread, being careful not to dislodge topping. Turn bread right side up and cool completely.


Wednesday, August 3, 2011

Boston Market Cornbread


Growing up we would get Boston Market every now and again for dinner. I don't remember the chicken, but I do *clearly* remember the macaroni and cheese and the cornbread. Ohhhh do I remember the cornbread. It was sweet and delicious, light and fluffy, crisp on the sides but soft within. Once I hit college there was a Boston Market near campus where my roommates and I would go sometimes... and guess what I'd get? Yup- a side of mac and cheese with 2 pieces of cornbread. (And I wondered how I gained the freshman college fifteen twenty....)

Now, there's no Boston Market close to us plus I have some pride and wouldn't want to eat mac and cheese and cornbread for dinner (well I'd want to, but I'd feel guilty). Even after all these years the desire for that cornbread just won't go away! So I turned to my best friend, Google, and found a knockoff recipe. This is pretty close! And now I understand why it's so good- it's basically cake. It should be called "Corn Cake" but I'll let that one slide. Best of all this gave me another chance to use my mini loaf pan I got for the holidays from my parents. I love having uses for my random kitchen tools! So give this a shot- if you don't have a mini loaf pan just put it in muffin tins. You can't lose.

Source: Food.com
*I halved this and if made 10 mini loaves.


Ingredients:
2 (8.5 oz) boxes Jiffy corn muffin mix
1 (18 oz) box butter OR yellow cake mix
5 eggs
2/3 cup milk
1 1/3 cup water
1/2 cup butter, softened

Directions:
1- Preheat oven to 350.
2- Combine all of the dry ingredients, mixing well.
3- Add the wet ingredients, stirring until just combined.
4- Pour into well greased muffin tins or mini loaf pans.
5- Bake about 30 minutes, until golden and a toothpick inserted in the center comes out clean.
6- Allow to cool in the pan. Then remove to a wire rack. Store in an airtight container.

Sunday, July 24, 2011

Cheesy Garlic and Herb Bread


I love garlic bread and seriously don't understand how someone could not like it. I mean, bread-good. Garlic-good. Butter-very good. Put it all together and you get an amazing side. Now, add some cheese to it and we're talking! When I made the Alouette pasta I was left with half a tub of this cheese and knew I'd need to incorporate it into several meals and dishes. I wasn't worried about this task since Alouette cheese is amazing, and I have to say this bread was delicious. I made it on roasted garlic ciabatta bread and there were chunks of roasted garlic throughout, topped with melted Alouette cheese... ugh, heaven. John and I were both silently gobbling up this bread which is always the mark of a good meal!

Source: Stephanie Cooks Original

Ingredients:
1 small loaf (about 10 inches) roasted garlic ciabatta bread, or any ciabatta/Italian bread
Alouette garlic and herb cheese
1-2 tbsp. butter
Garlic powder
Kosher salt
Parsley

Directions:
1- Slice the loaf of bread in half. Spread a thin layer of alouette cheese over both sides of bread.
2- Slice the butter very thin and lay over the bread evenly. Sprinkle with garlic powder, salt, and parsley.
3- Toast until golden, slice and serve. 

Sunday, March 13, 2011

Wheat Oatmeal Bread


Yeast and I have a long history of hating one another. Well, really, I think it was a one way hate-fest, with me hating on yeast, but you know what I mean. A few months ago after wasting a good amount of money on a pricey yeast-based recipe that failed miserably I became desperate. I was staring at these hard-as-rocks rolls that were now garbage, and I suddenly felt hasty. I had a bowl of dough proofing and I knew it wasn't going to rise properly. I was irritated and felt my hatred for yeast bubbling inside of me. Being a rational person, I decided to put the dough somewhere I couldn't see it to avoid me throwing the dough all over the kitchen in anger. Rational, right?  So I preheated the oven to 200, turned it off and let it cool a bit, then shoved my dough in the warm oven to rise. Out of sight, out of mind, and in a warm place. TA-DA! Perfectly risen dough. Since that day yeast and I are friends and I no longer fear yeast like the plague.

Now that I am no longer hiding from yeast recipes I decided it was time to try my hand at homemade sandwich bread. I looked for a wheat based recipe and stumbled upon this one. It was easy, the dough rose perfectly, and the bread was soft and lovely. In the process I discovered my newest cooking challenge- slicing bread. I can't draw a straight line with a ruler so cutting this bread was hysterical. Let's just say I need a longer knife, and I need to let John cut the bread next time. Most of the loaf was destroyed with my hacking slicing skills, but it was still delicious and enjoyable. I used this bread for an awesome version of grilled cheese that I'll be sharing with you on Tuesday- make sure you check back for it!

Source: White On Rice Couple

Ingredients:
c Water
1c  Milk
1 pkg (1 T or 10g) Active Dry Yeast
1 T Honey
2 T  Molasses (corn syrup or honey can be substituted)
2 1/2 c Whole Wheat Flour
2 c  Bread Flour
1 c Rolled Oats
4 T unsalted Butter, melted and cooled slightly
1 T Sea Salt


Directions:


lightly butter 9x5x3 bread loaf pan
1.  Gently warm milk and water to about 115 F. Combine water, milk, yeast, honey, and molasses in the bowl of a standing mixer. Stir to dissolve yeast. 
2. Add flours, oats, melted butter, and sea salt to the liquid mix.  Using the bread hook and stand mixer, mix for 6 minutes on medium speed. The dough should climb the dough hook and slap around the sides of the bowl without sticking. If the dough is sticking, add a tablespoon or two more of flour at a time until the dough comes cleanly away from the sides of the bowl.
3. Cover the bowl with a towel and place in a warm area to rise. Leave to rise for about an hour or until doubled in size (to test if it has proofed enough, gently poke the dough- if it springs back, it needs to proof longer – if a dimple remains, it is ready.)
4. Shape the loaf. Put the dough on a lightly floured work surface. Flatten out the bubbles while working the loaf into a square shape. Grabbing the top edge, fold the dough down towards the middle. Grab the bottom edge and fold up to the middle, bringing the two edges together. Pinch the seam and sides, sealing them with your fingers. Roll the dough back and forth, plumping it into an even log and about the size of your bread pan. Gently place the dough into your bread pan, seam side down. Press the dough gently into the corners of the bread pan.
5. Cover the loaf with a towel and leave it to rise in a warm area for about an hour or until the dough rises to half again its size and is puffing up barely over the edges of the loaf pan.
while the dough is rising, preheat the oven to 400 F.
6. If desired, sprinkle the top of the loaf with bran or oats. Bake for about 40 minutes, rotating halfway through.  The loaf is done baking when the crust is dark brown and sounds hollow when tapped. Remove the loaf from the pan and allow to full cool on a baking rack.

Saturday, January 29, 2011

Light Buttermilk Biscuits


A few weeks ago I made my favorite crockpot roasted chicken along with some roasted veggies. Being the carb-o-holic that I am, I couldn't simply leave well enough alone- I had to add some carbs to the meal. In passing my father mentioned that I needed biscuits with this meal and I couldn't agree more. Buttermilk biscuits it is.

The original recipe calls for rolling the dough out and cutting it with a biscuit (circle) cutter. I just wasn't in the mood. It was Sunday night, I had done nothing relaxed all day and wasn't in the mood to end the cycle. So I just grabbed a spoon and dropped the dough on a sheet. Hey- it may be lazy, but drop biscuits are wonderful, no? And wonderful these were. I could tell they were lighter, they weren't as buttery and rich tasting as traditional biscuits, but to me that's ok. John didn't know they were a lighter recipe so I guess maybe I could only tell because I knew. These will be made again and again, I assure you of that!

Source: Slightly adapted from  Weightwatchers.com

Ingredients:
1 cup all purpose flour
1.5 tsp. baking powder
1/2 tsp. baking soda
1/4 tsp. salt
2 tbsp. butter, chilled and cut into small pieces
1/2 cup lowfat buttermilk
Cooking spray

Directions:
1- Preheat the oven to 450.
2- Add flour, baking powder, baking soda, and salt in a bowl. Stir well.
3- Using a pastry cutter, or two knives, cut the butter into the flour mixture until it resembles course crumbs. (I also used my hands to really work the butter in.)
4- Knead the dough 4-5 times.
5- Using a large spoon, drop the biscuit dough onto cookie sheets covered with cooking spray (or a silpat). Bake for 10 minutes or until golden.

Yields 7 biscuits

** 3 Points Plus per biscuit, 7 biscuits total


Wednesday, January 26, 2011

Challah French Toast


When I think of the Food Network personalities my favorite is hands down Ina Garten. Most of the people in my age group love Giada or Rachel Ray, and while I too love both of them and see their mass appeal, there is just something to respect about The Barefoot Contessa. Ina is, in my opinion, a classic. A woman who knows her way around the kitchen. I turn to her anytime I am looking for a classic- and sure enough, when I wanted a classic challah french toast she was my lady.

I have an old standby recipe for french toast that I make. But when I found myself with 1/2 a loaf of challah in the freezer I knew what I needed to make. And boy- Ina didn't lead me wrong. This is a pretty simple recipe but the results are anything but. It made for a perfect "brinner" or "dinfast" (yah know... breakfast + dinner... ok, I'm lame, I get it.) Definitely try this out if you're in the market for a new french toast recipe. The original definitely makes a lot- I halved it and it was still a good amount for two people. Below is the quantity I made, but if you have a large family just check out Ina's version linked below.


Source: Slightly adapted from Ina Garten

Ingredients:
3 extra-large eggs
3/4 cup milk
1/2 tsp. ground cinnamon
1 tsp. grated orange zest
1/4 tsp. vanilla extract
1/2 tbsp. honey
1/4 tsp. kosher salt
1/2 large loaf challah bread
Butter or oil (for greasing the pan)

Directions:
1-Preheat the oven to 250 degrees F.
2- In a large shallow bowl, whisk together the eggs, orange zest, milk, cinnamon, vanilla, honey, and salt. Slice the  challah in 3/4-inch thick slices. Soak as many slices in the egg mixture as possible for 5 minutes, turning once.
3- Heat 1 tbsp. of either butter or oil in a very large saute pan over medium heat. Add the soaked bread and cook for 2 to 3 minutes on each side, until nicely browned. Place the cooked french toast on a cookie sheet and keep it warm in the oven. 
4- Repeat until all the bread is cooked. Serve hot with maple syrup.

Friday, January 21, 2011

Parmesan Garlic and Herb Croutons


I make light caesar salads as a side dish often. Very often. I don't do anything fancy- just romaine, some parmesan, and a high quality light caesar dressing. Oh- and croutons. Yes- croutons are a must. Only I recently ran out of croutons and kept forgetting to buy them, so we went weeks with coutonless salads- a real cryin' shame.

I realized that enough was enough and it was time to make some croutons. There's really nothing easier in the world- so why not, right? I didn't follow a recipe- I just chopped, tossed, baked, and then ate. Yum- eating these was the best part!


These croutons came out fabulous. I was pleased with how nicely they turned out. And best of all they are much healthier than store bought ones because I used  multigrain bread, less oil, and baked them instead of frying. I will never buy store made croutons again. Oh, and by the way- if you choose to snack on these instead of putting them in a salad, I won't judge you. I promise.


Source: Stephanie Cooks Original

Ingredients:
1/2 loaf good quality Italian bread, multigrain preferred
3 tbsp. extra virgin olive oil
1/4 tsp. garlic powder
1/4 tsp. Italian seasoning
1/4 cup grated parmesan cheese
Salt and pepper

Directions:
1- Preheat the oven to 350.
2- Line a cookie sheet with a silpat or parchment paper.
3- Taking the  bread, slice it in half horizontally. Then slice each piece in half vertically, so you have four long, thin slices of bread.
4- Cut the four bread pieces into even cubes, placing into a large mixing bowl- set aside.
5- In a small bowl combine the EVOO, garlic powder, Italian seasonings, and a dash of salt an pepper. Stir well.
6- Slowly drizzle the mixture over the bread cubes, stirring well. Continue pouring until all of the mixture is on the bread. (The bread cubes should be saturated in places, but they do not need to be completely covered in the mixture).
7- Toss in the parmesan cheese, stir well.
8- Spread the bread cubes out in a single layer on the sheet. Bake 15 minutes, remove from the oven, and stir well.
9- Bake another 15 minutes. Again, remove from the oven and stir well. At this point if they are hard and crisp, leave them out to cool. If not return to the oven for 10 minutes or so.
10- Allow the croutons to cool completely before storing in an airtight container.

Saturday, December 4, 2010

Light Wheat Rolls


On Thanksgiving I made two types of rolls. One was an herb and onion dinner roll recipe and the other was this gem of a recipe. I unfortunately won't be posting the herb and onion ones because my picture came out pretty bad and I don't want to poorly represent them.... I guess I'll just have to remake them, such a shame... not! I'm secretly excited that I have a reason to remake those yummy rolls.

Anyway, as always, I've gotten off topic. These light wheat rolls were my best experience with yeast to date. They just rose perfectly, tasted nice and light with a subtly wheat taste... overall, perfect. I also am a sucker for pretty things and I loved how pretty they looked all swirled up. Best of all these aren't bad for you- so you can eat like 10 of them! Or not... but it is the holiday season, so I won't judge.

Source: All Recipes


Ingredients

  • 2 (.25 ounce) packages active dry yeast
  • 1 3/4 cups warm water (110 degrees F/45 degrees C)
  • 1/2 cup white sugar
  • 1 teaspoon salt
  • 1/4 cup butter, melted and cooled
  • 1 egg, beaten
  • 2 1/4 cups whole wheat flour
  • 2 1/2 cups all-purpose flour
  •  
  • 1/4 cup butter, melted

Directions

  1. In a large bowl, dissolve yeast in warm water. Let stand until creamy, about 10 minutes.
  2. Mix sugar, salt, 1/4 cup melted butter, egg, and whole wheat flour into yeast mixture. Stir in all-purpose flour, 1/2 cup at a time, until dough pulls away from the sides of the bowl. Turn dough out onto a well floured surface, and knead until smooth and elastic, about 8 minutes. Lightly oil a large bowl, place dough in bowl, and turn to coat. Cover with a damp cloth, and let rise in a warm place until doubled in volume, about 1 hour.
  3. Punch down dough, cover, and let rise in warm place until doubled again, about 30 minutes.
  4. Grease 2 dozen muffin cups. Punch down dough, and divide into two equal portions. Roll each into a 6x14 inch rectangle, and cut rectangle into twelve 7x1 inch strips. Roll strips up into spirals, and place into muffin cups. Brush tops with melted butter. Let rise uncovered in a warm place 40 minutes, or until doubled in bulk.
  5. Preheat oven to 400 degrees F (200 degrees C). Bake for 12 to 15 minutes, or until golden brown. Remove from oven, and brush again with melted butter.

Friday, November 5, 2010

Cinnamon Walnut Bread


I love quick bread. LOVE LOVE LOVE. There is just something satisfying about the whole experience. I have made a few in the past and continue to be obsessed with the whole experience. When this recipe popped up in my google reader I squealed! I mean, c'mon- what's better than a quick bread recipe where you already have all of the ingredients on hand?!

I made this a week or so ago and John and I happily ate it for breakfast all week. As far as quick bread goes this one is a bit "healthier" and could be made even better with wheat flour. This bread was just awesome. I loved the spice from the cinnamon and the texture of the nuts. Perfect for fall!

If you're into quick bread, here are a few other quick breads I have made over the years.
Garlic Cheddar Quick Bread
Banana Chocolate Chip Bread
Cinnamon Swirl Bread
Buttermilk Quick Bread

Source: Eat, Live, Run

Ingredients:


2 cups flour
2 tsp baking powder
1 tsp cinnamon
1 cup milk
1/3 cup sugar
1/2 cup walnuts
1 beaten egg
1/2 tsp salt
In a large bowl, mix together the dry ingredients. Add the beaten egg and milk and stir. Fold in the walnuts. Pour into greased loaf pan and bake at 350 for about forty minutes, or until golden (stick a knife in the center to make sure it comes out clean). Let cool and slice. 

Monday, October 11, 2010

Garlic Cheddar Quick Bread

I've mentioned my undying love for googling random ingredients and seeing what comes up. Well, that love is still continuing. I wanted to make some type of garlic and cheese bread but I didn't have time to use yeast so after a quick search I stumbled upon this recipe.

This recipe came together in about 10 minutes and then into the oven it went. That's my idea of a great recipe! As it was cooking I was moaning (literally) over how amazing it smelt. I couldn't even wait for it to cool- the second it came out I sliced off a piece and dove in. John was more than happy to split it with me- the smell was intoxicating. Think garlic cheddar bay biscuits from Red Lobster- that's what it smelt like.

After the first bite the verdict was in- delicious. It was lightly seasoned and very fluffy. I had added some extra seasonings and it was still lightly seasoned- next time I would double the seasonings. The texture was of a typical quick bread- soft and dessert like. I had something else in mind though- grilled cheese! And while it was interesting because the bread was crumbly, it was still a mighty epic grilled cheese.

Definitely worth making. You won't be able to resist it. I froze the sliced and can't wait to eat them with our meals in the upcoming weeks. My only suggestion would be to double the garlic powder, but you know me and garlic... there's no such thing as too much!

Source: Adapted from Taste of Home

Ingredients:
3 cups all-purpose flour
4.5 tsp. baking powder
1 cup shredded sharp cheddar cheese
1/4 cup sugar
1 tsp. garlic powder (could be doubled if you like a lot of garlic)
1/2 tsp. Italian seasonings, divided
1.5 cups milk
1/4 cup vegetable oil
1 egg

Directions:
1. Preheat the oven to 350. Combine the flour, baking powder, cheese, sugar, garlic powder, and 1/4 tsp. Italian seasoning in a bowl.

2. In a separate bowl combine the milk, oil, and egg. Stir into dry ingredients until moistened.

3. Pour into a greased 9x5 loaf pan. Top with additional 1/4 tsp Italian seasoning. Bake for 55-60 minutes, or until a toothpick inserted into the middle comes out clean.

4. Allow to cool in pan for 10 minutes. Then transfer to a wire rack to cool.

Sunday, June 27, 2010

Whole Wheat Pizza Dough


Pizza, what's not to love? Sauce, cheese, crusty bread... all over goodness. Top it with some delicious toppings and you're on a roll. I have made homemade pizza dough before and loved it. That recipe is very classic and as good as restaurant quality. However, I really wanted to make a healthier dough, one that incorporated whole wheat, and decided to try out a new recipe. This came together quickly and effortlessly. If you have never made dough before and are intimidated this is a great place to start. I chose to make it into 6 individual crusts but I think they are too small. Next time I'd do 4 crusts. It was a good size for me but John immediately went to the pantry for a snack after dinner haha! I am really looking forward to eating the dough that's in the freezer- lots of pizza in out future.

Now, this is whole wheat dough. It does have a bit of a grainy taste, but to me that's a good thing. If you didn't know it was whole wheat you probably wouldn't notice. It made a very thin, crunchy crust. A big hit in our household!

Source: Eating Well

INGREDIENTS

3/4 cup plus 2 tablespoons lukewarm water, (105-115°F)
1 package active dry yeast, (2 1/4 teaspoons)
1 teaspoon sugar
1/2 teaspoon salt
1 cup whole-wheat flour
1 cup bread flour, or all-purpose flour, plus additional for dusting
2 tablespoons yellow cornmeal

Directions:
Stir water, yeast, sugar and salt in a large bowl; let stand until the yeast has dissolved, about 5 minutes. Stir in whole-wheat flour, bread flour (or all-purpose flour) and cornmeal until the dough begins to come together.

Turn the dough out onto a lightly floured work surface. Knead until smooth and elastic, about 10 minutes. (Alternatively, mix the dough in a food processor. Process until it forms a ball, then process for 1 minute to knead.)

Place the dough in an oiled bowl and turn to coat. (To make individual pizzas, see Variation.) C over with a clean kitchen towel and set aside in a warm, draft-free place until doubled in size, about 1 hour.

Individual variation: The dough can be turned into 4 or 6 personal-size pizzas. After kneading, divide the dough into 4 or 6 equal balls (I'd suggest 4- I made 6 and they are pretty small). Brush with oil and place 3 inches apart on a baking sheet. Cover and set aside until doubled in size, about 1 hour. Roll each portion into a 6-to-8-inch circle.

To store dough you aren't using now, prepare through Step 3, cover the bowl with plastic wrap and refrigerate for up to 1 day. Or tightly wrap the unrisen dough in oiled plastic wrap and freeze for up to 3 months. Defrost the dough in the refrigerator overnight. Let refrigerated (or previously frozen) dough stand at room temperature for 1 hour before using.

Preheat oven to 450 with a pizza stone in the oven.

Cover a baking sheet with parchment paper. Roll out the dough on the parchment paper. Cover with toppings. Bake in the oven for about 10 minutes, of until the crust is golden and the cheese is melted.

Thursday, April 1, 2010

Whole Wheat Corn Bread


Hey everyone! I am so so so SO sorry for my long absence. If you read my fitness blog you are probably aware that the past few weeks were insane for me! I then went on a cruise and am just now returning. Let me tell you- being a foodie makes going anywhere hard! On numerous occasions I would eat something on the cruise and think "Meh- I could make this tastier if I added xyz to this recipe!" I am dying to get back in my kitchen after this long break so get ready for some goodies!

I made this recipe a long time ago and really enjoyed it. It had a nice healthy taste and was quite satisfying. I will say that it wasn't very moist so I chose to eat it with butter or something to add some moisture to the corn bread. If you are looking for a way to have a BIG hunk of corn bread without eating a lot of calories this is a great choice.

Source: Adapted from the Quaker Corn Meal container

Ingredients:

1 1/4 c. whole wheat flour
3/4 c. cornmeal
1/4 c. sugar
2 tsp. baking powder
1/2 tsp. salt; optional
1 c. skim milk
1/4 c. applesauce
2 egg whites

Directions:
Heat oven to 400 degrees. Grease 8-9 inch baking pan. Combine dry ingredients. Stir in milk, applesauce, and egg; mixing just until dry ingredients are moistened. Pour batter into prepared pan. Bake 20-25 minutes or until golden brown. Serve warm.

** 3 points for 1/9 of the recipe